Accessing the Cloud
If your device has not yet been used to access the CIO Private Cloud, you will first need to install the Citrix Receiver (Workspace App).
Installing Citrix Receiver (Workspace App) on your device:
- Open a browser on your workstation.
- Enter https://www.citrix.com/products/receiver.html into the address bar.

- This will open a new page. Click to Download Citrix Workspace App *NOTE: if using a Mac, the receiver install page will detect this and offer the Mac version to download and install.

Follow the prompts to install:
From your workstation:
- If you don’t have a shortcut set up, open a web browser and navigate to ciosolutions.com
- On the upper right corner, click on the CIO Private Cloud Login button.

- Enter your credentials and click “Log On”.
Note: your username is your email address.
- The screen icon will change its color to a blue as your Cloud is being loaded.
Note: some internet browsers require you to download a file named “launch.ica”. This is normal. Click “Open” to load your Cloud desktop.
- Your Cloud window may turn black for a few seconds while it is loading
*You may also use the cloud from a tablet or other device but may first need to download the Citrix Receiver from the app store before going to the www.ciosolutions.com and accessing the cloud from your browser
Using the Cloud
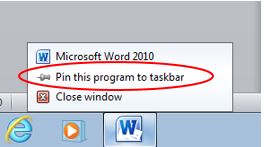
- If pinned, the program’s icon will always stay on the taskbar, even when it is not open.
- Open the program from the Start Menu. The program’s icon is now temporarily on the taskbar.
- Right click on the temporary icon.
- Select “Pin this program to taskbar”.
- To unpin a program, follow the steps above and select “Unpin this icon from the taskbar”.
- You can switch between window mode and full-screen mode by selecting the appropriate view option on the black toolbar. The screen will turn gray for a short moment while the resolution is adjusting to the new setting.
- To use your cloud with multiple monitors:
- Change your Cloud Desktop to window mode
- Drag the Cloud Desktop window in between the monitors (if you have more than 2, you might need to expand the window so part of it is on all monitors)
- Change your Cloud Desktop to full-screen mode
- You can send a “CTRL+ALT+DEL” command to the Cloud Desktop using the button on the toolbar. This combination on your keyboard will always be sent to the local computer.
- The “Preferences” dialog allows you to adjust your personal Cloud settings related to screen resolution, file access to your local computer and local device usage.
- USB Devices like thumb drives should automatically work in your cloud session and be available under your computer’s folder after about a minute while it loads
- If they are not working properly, pull down the Devices on the black toolbar to make sure that they are checked
- If they are still not working properly, please call CIO Support at 1.888.662.9086
- When closing your Cloud session, you can either disconnect your session or log off.
| Action | Disconnect | Log Off |
| Description | Ends session, but does not close your Cloud’s open programs and windows.
Similar to a computer’s Sleep mode. |
Ends session, closes all windows and programs running on your Cloud.
Similar to shutting down a computer. |
| When to use | If you want to quickly get back to your Cloud session after a break. | At the end of the day to get a fresh start next time.
Before scheduled Cloud maintenance windows. To troubleshoot issues with programs or your user profile. |
| Example | Leave a document open on the Cloud and disconnect your session. Open a new session on your phone and the document is still open on the Cloud desktop. | Logging off before the weekend when you shut down your computer.
Also, logging off and logging back on to do a virtual restart of your Cloud. |
- Click the Windows Start Button
- Click the Power button in the upper-right

- Click on “Log off”
- Good to use when your cloud session is not working properly (similar to how you used to reboot your PC when it wasn’t working right before the cloud) . This fixes most cloud issues.
For questions or problems with your cloud desktop, please contact:
CIO Solutions Support:
888.662.9086
![]()


